ARKit Theory: The Point Cloud, Image Recognition, AR Ready Images, True Scale, The Renderer and Nodes


I may have had a glimpse to how this man felt.
Last night, in a moment of solace, surrounded by the closest of friends, I had a breakthrough. I had finally completed a set of lies that made sense and which, later when tested, worked. Here’s the breakdown.
The Point Cloud
One could claim The Point Cloud to be the cornerstone behind the magic of AR. The Point cloud is a set of data points in 3 dimensional space which things can be anchored, or ‘glued to. Allowing humans to see and move around virtual things in space. These points are created based on features in the world that tell the iPhone a story about depth and perception and through it position within space and time. Finally, fused with the accelerometer in the phone, this data allows your phone to more accurately track movement within space.
The mesh produced in this video is an example of the point cloud:
Image Recognition
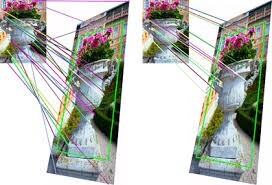
Image recognition, or feature recognition, is the a machine-learning process which identifies images along with their rotation and size within space.

The algorithm detects feature points and uses them to identify images and their rotation in space.
Through this feature recognition, is creates a “node” in the point cloud via an ARImageAnchor, to which you can tie things to. These things can be images, videos, spatial sounds, or 3D based scenes.
ARImageAnchors Overview:
“When you run a world-tracking AR session and specify ARReferenceImage objects for the session configuration's detectionImages property, ARKit searches for those images in the real-world environment. When the session recognizes an image, it automatically adds to its list of anchors an ARImageAnchor for each detected image.
To find the extent of a recognized image in the scene, use the inherited transform property together with the physicalSize of the anchor's referenceImage.”
— Apple Docs, 2018.
Creating AR-Ready Images
This is best explained here. I recommend you read the documentation in depth.
Working in True Scale
The difference between working in true scale is super significant in ARKit in comparison to Vuforia, where it appeared not to matter.This scale is used to gather a greater understanding of position and depth within space. It is the key feature that allows you to place stable, anchored objects in space.

Scale is set in the inspectors menu on the RHS.
This breakthrough came when I realized that although the elements appeared to be correct in scale and position, the moment I moved, the elements would mess up — to the point that they were METERS behind the image that I had set in space.
Questioning if this was due to a low feature count (best in class) into ARKit, I paused and took one final attempt — to work in true scale. BOOM.
The Renderer
The renderer is the piece of the puzzle that is responsible for making things look the way they look in ARKit. You can even go ahead and say that objects are ‘Renderered’ in space.
Here are the key functions:
func renderer(_ renderer: SCNSceneRenderer, didAdd node: SCNNode, for anchor: ARAnchor)
This function is responsible for finding new nodes. These nodes can be due to images or features in space. The sample ARImageRecognition software detailed here, demonstrates how to handle nodes which represent images.
func renderer(_ renderer: SCNSceneRenderer, willUpdate node: SCNNode, for anchor: ARAnchor)
This function gets called when a change in a node position happens.
func renderer(_ renderer: SCNSceneRenderer, didUpdate node: SCNNode, for anchor: ARAnchor)
This function gets called after a node gets updated, and allows you to change anything after an update.
These last two functions are fundamental for any stabilization functionality, as they allows you to see changes before and after an update and correct them.
Nodes
As detailed in the point cloud section above, nodes are representations of a transform (position, rotation and scale) within three dimensional space that are acquired by features in the natural environment.
In the case of Image Targets — ARKit finds the image, determines the image is transform, and create an invisible cube at the center of the image with the same position, rotation and scale as the image.

Ok so lets say you want to position your object 0.1m to the right. You would want to change the position of your scene or geometry to:
YOUR_SCENE_OR_GEO.position = SCNVector3.init(0.1, 0, 0);
0.1m to the left would be:
YOUR_SCENE_OR_GEO.position = SCNVector3.init(-0.1, 0, 0);
0.1m to infront the target would be:
YOUR_SCENE_OR_GEO.position = SCNVector3.init(0, 0.1, 0);
0.1m to behind the target would be:
YOUR_SCENE_OR_GEO.position = SCNVector3.init(0, -0.1, 0);
0.1m above the target would be:
YOUR_SCENE_OR_GEO.position = SCNVector3.init(0, 0, -0.1);
0.1m below the target would be:
YOUR_SCENE_OR_GEO.position = SCNVector3.init(0, 0, 0.1);
That's a wrap
Please email us any questions that you may have using the contact form.
